6. Tutorial 3: Your first topographic analysis
By now you should have compiled the program LSDTT_analysis_from_paramfile.out.
If you haven’t done this, go to the previous tutorial Tutorial 2: LSDTopoTools analysis driver: getting and compiling the program.
6.1. Make a folder for your data
Don’t be messy! You should have a sensible directory structure for your data. The program LSDTT_analysis_from_paramfile.out allows you to both write and read data from directories of your choice so there is no need to pile everything in one directory.
If you have just come from tutorial 2, you may wish to navigate down 2 layers and make a data folder. Remember pwd displays your current directory:
smudd@burn analysis_driver $ pwd
/home/smudd/topographic_tools/topographic_analysis/analysis_driver
smudd@burn analysis_driver $ cd ..
smudd@burn topographic_analysis $ cd ..
smudd@burn topographic_tools $ mkdir topographic_data
smudd@burn topographic_tools $ cd topographic_data
smudd@burn topographic_data $ pwd
/home/smudd/topographic_tools/topographic_data
smudd@burn topographic_data $
You can choose your own directory structure.
My personal method is to first organise by type of data (e.g., LiDAR, SRTM, ASTER, or in this case NextMap). I’m afraid you can’t just download NextMap like you can the other datasets, which is stupid because we as British citizens paid for it. Write to you MP about that! Luckily the same is not true for Environment agency LiDAR, which if free for academic use. Well done EA!
I then put in the location. So for example:
smudd@burn topographic_data $ pwd
/home/smudd/topographic_tools/topographic_data
smudd@burn topographic_data $ mkdir NextMap
smudd@burn topographic_data $ cd NextMap
smudd@burn topographic_data $ mkdir Scotland
smudd@burn topographic_data $ cd Scotland
smudd@burn topographic_data $ pwd
/home/smudd/topographic_tools/topographic_data/NextMap/Scotland
6.2. Get example data and convert to a valid format
You can now download the example data:
smudd@burn topographic_data $ wget http://www.geos.ed.ac.uk/~smudd/export_data/WhiteadderDEM.tifThis is in .tif format! You need to convert to a valid file format.
For this use GDAL. See here Converting between formats using GDAL:
gdal_translate -of ENVI WhiteadderDEM.tif WhiteadderDEM.bilSee if the file is there:
smudd@burn Scotland $ ls
WhiteadderDEM.bil          WhiteadderDEM.hdr
WhiteadderDEM.bil.aux.xml  WhiteadderDEM.tif
If you really want to make sure everything is working you can run gdalinfo to see the properties of WhiteadderDEM.bil.
6.3. Move the example paramfile to the data folder
- The code is flexible enough that the parameter file can be in a different location from the data, but I think it is good practice to keep the parameter files with the data. The parameter file not only runs the software, but more importantly it is a reproducible record of your analyses! So if you are doing research you should save these files. The software is designed so that if you send someone else the parameter file and the DEM they can reproduce your analysis exactly. This differentiates our software from GUI driven software like ArcMap and QGIS.
Okay, lets actually move the file. An example file came with the source code. You can use the cp command to make a copy of this file in your data folder. NOTE You directories will have different names than those shown here so modify the paths shown below appropriately:
smudd@burn Scotland $ cp /home/smudd/topographic_tools/topographic_analysis/analysis_driver/Example.LSDTT_driver Example.LSDTT_driverCheck to see if the file is there:
smudd@burn Scotland $ ls
Example.LSDTT_driver  WhiteadderDEM.bil.aux.xml  WhiteadderDEM.tif
WhiteadderDEM.bil     WhiteadderDEM.hdr
Lets make a copy with a different name:
cp Example.LSDTT_driver Whiteadder.LSDTT_driver
6.4. Running your first analysis.
First of all, I recommend having two terminal windows open, one in the data folder and one in the folder with the program LSDTT_analysis_from_paramfile.out.
6.4.1. Modifying the parameter file
Before you run the program you need to modify the parameter file. The parameter file is just plain text, so you will need a text editor to modify it.
You can modify it in your favourite text editor, but don’t use a program that inserts a bunch of stupid formatting like Wordpad or Word.
In fact most text editors in Windows systems have the unfortunate habit of inserting diabolical hidden characters, called control characters that you will never see or notice if you just look at text but will completely screw up the program. We have endeavoured to remove these characters within our code, but I highly recommend editing the parameter file either in linux, or using a text editor on Windows that won’t insert these characters.
For windows, the best option (for Edinburgh users) is
- Pspad This is installed on all University of Edinburgh computers.
For linux, I use either
These linux text editors take a bit of getting used to, so unless you are going to start writing code, you should probably stick with pspad.
In Pspad, to make sure you are using UNIX formatting, you can click on a little symbol at the bottom of the screen:
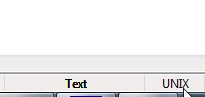
Note, by clicking through this you can cycle through MAC, DOS, and UNIX formatting. You want UNIX formatting.
Okay, lets get started modifying this file. Open it in your text editor. It will look a little bit like this:
# This is a driver file for LSDTopoTools
# Any lines with the # symbol in the first row will be ignored

# File information
dem read extension: bil
dem write extension: bil
read path: /home/smudd/SMMDataStore/Topographic_Data/NextMap_old/Scotland
read fname: WhiteadderDEM

# Parameters for various topographic analysis
min_slope_for_fill: 0.0001
# pixel_threshold_for_channel_net: 200

# The different analyses to be run
write fill: true
write hillshade: true
# write channel_net: true
These files have a specific format. Any line that starts with the # symbol is ignored: you can put comments here.
Lines with parameters are separated with a colon (:). The text before the colon is the parameter, and the text after the colon is the parameter value.
For example, in the above file, dem read extension is the parameter and bil is the parameter value.
- The parameter names are NOT case sensitive: dem read extension is the same as DEM rEaD extenSION as far as the program is concerned.
- The parameter values ARE case sensitive: bil is NOT the same as BIL.
- The program will only understand the parameter name if you get it exactly correct. So if you misspell or put an underscore where a space should be, the program will not be able to understand. So be careful when editing these files!!
Okay, first, we want to make sure the file path and the file names are correct. These two lines:
dem read extension: bil
dem write extension: bil
say that you want to read and write ENVI files. That is what we want so we leave these alone. The default is bil so you could actually delete these two lines and the program would still work.
Next are lines for the read path and the read fname. If you didn’t have lines for these it would default to the path of the parameter file and the name of the parameter file, excluding everything after the .. However I would recommend assigning these. To figure out what the path to your data is, first make sure the data is there (with) ls and then type pwd to get the path:
smudd@burn Scotland $ pwd
/home/smudd/topographic_tools/topographic_data/NextMap/Scotland
The read fname is the name of the DEM WITHOUT the extension. So if the DEM is called WhiteadderDEM.bil then the read fname would be WhiteadderDEM. These names are CASE SENSITIVE. You should modify your parameter file with the correct directory:
# This is a driver file for LSDTopoTools
# Any lines with the # symbol in the first row will be ignored

# File information
dem read extension: bil
dem write extension: bil
read path: /home/smudd/topographic_tools/topographic_data/NextMap/Scotland
read fname: WhiteadderDEM

# Parameters for various topographic analysis
min_slope_for_fill: 0.0001
# pixel_threshold_for_channel_net: 200

# The different analyses to be run
write fill: true
write hillshade: true
# write channel_net: true
Note: do not just copy the above file: your directory will be different!
You can also change the path and name of the files you write. The keywords are write path and write fname. For example:
write path: /home/smudd/a_different/directory
write fname: DifferentDEMname
If you leave these blank then the output will just write to the read directory. For now don’t add write path information.
Further down there are some parameters:
# Parameters for various topographic analysis
min_slope_for_fill: 0.0001
# pixel_threshold_for_channel_net: 200
The first one min_slope_for_fill sets a minimum topographic slope after the fill function. The fill function makes sure there are no internally drained basins in the DEM, and is a rather standard topographic analysis function. Note that the parameter name has underscores: don’t replace these with spaces or the program won’t understand!
The parameter is actually a bit redundant since the default for this parameter is 0.0001, so deleting this line wouldn’t change the output. However, the line is left in if you want to change it.
The next line has a # symbol in front so is ignored by the program.
The next bit tells the program what you want to do with the DEM.:
# The different analyses to be run
write fill: true
write hillshade: true
# write channel_net: true
In this case these instructions are telling the program to write the fill DEM and the hillshade DEM. The program will not write a channel network (write channel_net) since this line has a # as its first character.
You might be asking: doesn’t ArcMap and QGIS have fill and hillshade functions? They do indeed, but for large rasters our code is much faster, and using our parameter files you can create reproducible analyses that can easily be sent to collaborators, students, clients, etc.
These functions will only run if the parameter value is true.
Okay, save your changes to the parameter file; we will now move on to performing the analyses.
6.4.2. Running the analyses (in this case, writing fill and hillshade rasters)
You need to run the program (LSDTT_analysis_from_paramfile.out) from the folder containing the program. Hopefully you have followed my advice and have two terminal windows open, one open in the folder with the data, and one in the folder with the program LSDTT_analysis_from_paramfile.out. You’ll be working in this latter window.
LSDTT_analysis_from_paramfile.out runs with two arguments:
- The path to the parameter file.
- The name of the parameter file.
You should have already found the path to your data (go to your data folder and type pwd). The name of the parameter file includes extension. So to run the program you type this:
./LSDTT_analysis_from_paramfile.out /home/smudd/topographic_tools/topographic_data/NextMap/Scotland Whiteadder.LSDTT_driverThe ./ is a linux thing. When you run programs you tell linux that the program is in this directory with ./.
Once you’ve entered this, there will be some output to screen telling you what the code is doing, and then it will finish.
LSDTT_analysis_from_paramfile.out has put the output in the data folder, so use ls in this folder to see if the data is there:
smudd@burn Scotland $ ls
Example.LSDTT_driver       WhiteadderDEM.tif    Whiteadder_hs.hdr
WhiteadderDEM.bil          Whiteadder_fill.bil  Whiteadder.LSDTT_driver
WhiteadderDEM.bil.aux.xml  Whiteadder_fill.hdr
WhiteadderDEM.hdr          Whiteadder_hs.bil
smudd@burn Scotland $
- Hey, look at that! There are a bunch of new files. There are two new rasters, each with a bil file and a hdr file. These are the fill raster: Whiteadder_fill.bil and the hillshade raster Whiteadder_hs.bil.
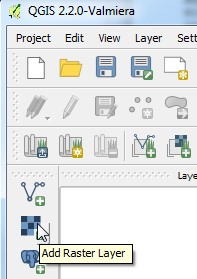
6.4.3. Look at the output in QGIS
Now that you’ve done some analyses, you can look at the data in QGIS. Start QGIS. Then open the resulting raster using the Add raster layers dialog:
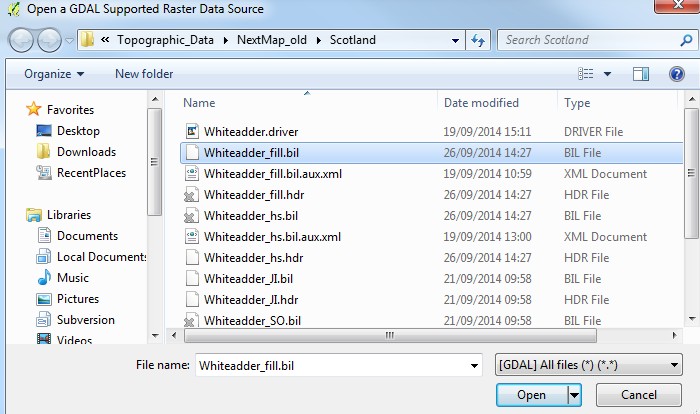
Choose the raster. You want the bil files:
If you open the hillshade, you should get a nice pretty picture like this:
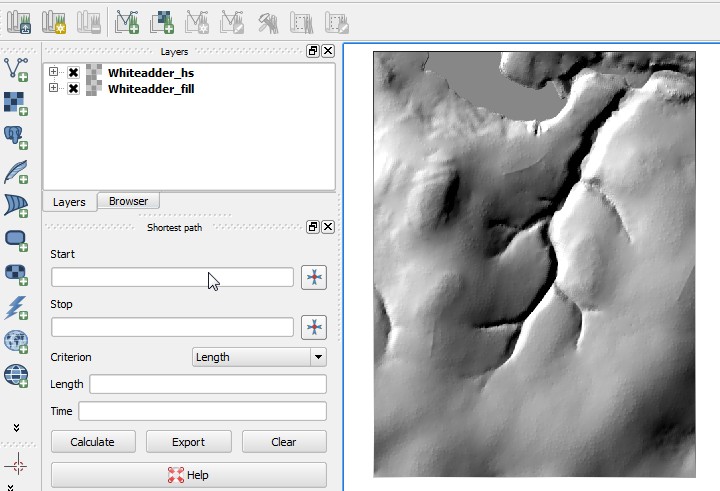
Great! Now you have got a handle on some of the basics of running LSDTT_analysis_from_paramfile.out and looking at the results.