2. Instructions specific to the University of Edinburgh
The documentation available on this page is specific to University of Edinburgh users. It includes information on how to access our servers and how to compile the code on our systems.
2.1. Getting onto our servers using NX
Our code is designed to be run in the Linux operating environment. You can actually get your windows computer to act a bit like a Linux terminal by downloading the Cygwin package (see appendix). If you work on a Mac you can also get Linux because the Mac operating system is built on top of Linux: to get there you need to call the ‘terminal’ application. However, the way we mostly operate is via the School of GeoSciences Linux servers. The main one is called ‘burn’. The preferred way to get into it is via an NX window.
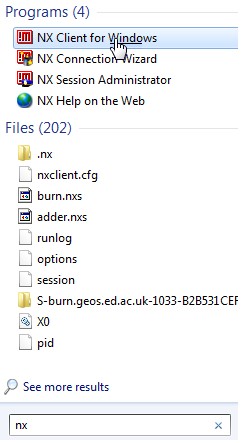
In the windows menu, type nx, and you will see the nx client:
The ‘host’ is burn.geos.ed.ac.uk
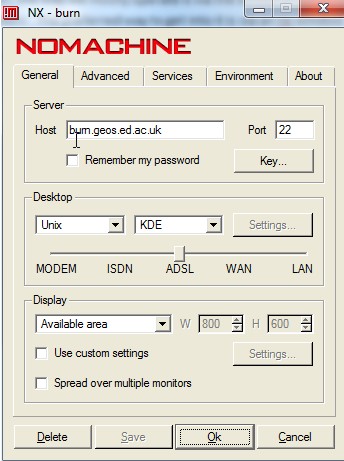
You then need to enter your username and password.
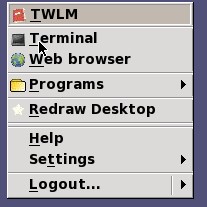
You will get a sort of blank looking blue desktop. If you right click on this desktop you get the option to start a terminal:
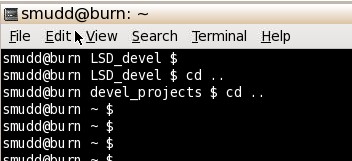
Once you start a terminal you will see little screen that tells you what account you are on, where you are (so in the below image, I am smudd and I am ‘@’ burn, followed by the directory (if it is the ‘~’ symbol that means it is your home directory).
At this stage, you need to familiarize yourself with some linux commands for moving around in directories. I’ll wait while you read this: http://www.ee.surrey.ac.uk/Teaching/Unix/ and this: http://www.skorks.com/2009/09/bash-shortcuts-for-maximum-productivity/
The main commands you will need are ‘cd’, ‘cd ..’ and ‘ls’. Also, the tab key, ctrl-r, ctrl-a and ctrl-e will save you vast amounts of time.
2.1.1. Using NX from your home computer
You can get NX for your home computer in order to work on your subversioned files sitting on your home directory.
You’ll want to set up a VPN on your computer.
Information on the University’s VPN service can be found here: http://www.ed.ac.uk/schools-departments/information-services/services/computing/desktop-personal/vpn
NX software is free, so if you manage your own computer, you can get it here: http://www.nomachine.com/download
If you are on a university laptop, NX should already be installed.
2.2. Using Subversion
Our subversion repository is housed at The Edinburgh compute and data facilities (ECDF).
2.2.1. Examining past changes
ECDF has web pages attached to repositories that allow users to look at changes made so far, and to see changes made to the code at every revision.
These websites are called SourcEd websites, and you can read all about them here: https://www.wiki.ed.ac.uk/display/ecdfwiki/Version+Control+Service
Our SourcEd page is located here: https://sourced.ecdf.ed.ac.uk/projects/geos/LSD_devel
If you click on the timeline tab you can see a timeline of ‘commits’ (that is, changes to the repository files).
If you log in you should be able to see the actual source files and the changes made at each revision.
2.2.2. Looking at what is in the repository from the command line
You can check the contents of the repository from your terminal window with the command:
svn ls https://svn-kerberos.ecdf.ed.ac.uk/repo/geos/LSD_develYou can also look at subdirectories using this command, e.g.:
svn ls https://svn-kerberos.ecdf.ed.ac.uk/repo/geos/LSD_devel/LSDTT_Docs/trunk
2.2.3. Accessing the repository and using subversion from a windows machine
From the University servers you should use the https://svn-kerberos.ecdf.ed.ac.uk address. You might, however, need to work from a windows machine (say your laptop, from home). You can still use subversion to track changes, but the access into the repository is slightly different. From a windows machine, you should access the repository using this:
https://svn.ecdf.ed.ac.uk/This non kerberos system will require a username and password. The password is NOT your ease password. You will need to enter another password at https://registration.ecdf.ed.ac.uk/svnreg/userreg.php
Once you have registered, you can use a windows based svn client like tortoise SVN.
2.2.4. Checking out the code
Before you start editing you need to ‘check out’ the code from the SVN repository. If this is the first time you are doing this, go to some folder where you are going to place the model directory tree. This is going to include the parent folder. In the repository, there is a parent folder called LSDTopoTools, and in this folder are the folders branches, tags and trunk.
We are ONLY going to checkout what we need. The source files are in trunk. So make a directory into which you will check out truck and all of the files therein. Once you have done this, navigate into the folder where you are going to put trunk. To see if the trunk exists, type:
svn ls https://svn-kerberos.ecdf.ed.ac.uk/repo/geos/LSD_devel/LSDTopoTools/trunkTo checkout, type:
svn co https://svn-kerberos.ecdf.ed.ac.uk/repo/geos/LSD_devel/LSDTopoTools/trunk LSDTopoToolsThe last string tells SVN to checkout into a folder called LSDTopoTools
2.2.5. Updating your code at the start of an editing session
You ALWAYS want to be working on the latest version of the code, so it is important that you update to the latest version before you start working on it.
If you have checked out the code and it is sitting in your local directory, you don’t have to keep checking it out every time you work on it. Instead you can just ‘update’ it. Navigate to the folder with the code that was originally checked out and type:
svn update .
2.2.6. Making changes to the code
Once you have updated your code, you can then start editing it.
In many circumstances you can just edit the code directly (that is edit the subversioned file without making a copy).
Once you are finished editing, you have to ‘commit’ the changes. Simply saving the file will not update the repository and nobody else will be able to use your changes!
2.2.6.1. The commit command
The svn commit command saves your changes to the repository. You can commit by either specifying a speicifc file:
svn commit -m "I updated LSDRaster with a new gradient operator" LSDRaster.cppOr if you have modified a number of files you can commit your current directory:
svn commit -m "I updated a lot of stuff" .The . is shorthand for this_directory.
Note, to commit you need the -m flag and then a message in quatation marks. You MUST leave a message (that is what the -m stands for).
Best practice is to have a fairly descriptive message so that other contributors to the code don’t have to trawl through the source code in order to see what has been updated.
2.2.6.2. Patching files with patch and diff
On occasion you might make a copy of the code, keep editing until you are sure it works, and then copy those changes back to the subversioned file. Or say you had version control on a file, LSDRaster.cpp. Then you got lazy and worked on the code for a year without using subversion. Now you need to get the new code into subversion.
This is not actually as strightforward as you might expect!
If you copy a file from your subversioned folder to another folder, make updates in this other folder, and try to copy the file back to your subversioned folder then subversion will not recognize it!
Instead you have to use two unix programs called patch and diff.
Say you have an out of date copy of LSDRaster.cpp in the repository. Check this out and then save it in the folder with the working copy as LSDRaster_old.cpp.
Then run diff on the two copies:
diff -u LSDRaster_old.cpp LSDRaster.cpp > LSDRaster_cpp.patchYou now made a patch. You can then copy this patch to the subversioned folder, and patch the subversioned file:
patch < LSDRaster_cpp.patchWhat you should now have is the updated version of LSDRaster.cpp in your subversioned local trunk directory. You can then commit this change to the repository:
svn commit -m "Patched the BIG MERGE" LSDRaster.cpp
2.2.6.3. A little trick for search and replace
At some point you might find yourself renaming some method or changing something in a number of files. A convienient way to do this is with a simple perl script:
perl -pi -e 's/oldtext/newtext/g' *This replaces all instances of oldtext with newtext. It will do this for all files in the current directory, but will not go into subdirectories.
2.2.6.4. Adding new files to the repository
Suppose that you have patched and committed your changes. You might have also made some new objects. You will need to add these using the add command in svn. After you add them you will need to commit. So, for example:
svn add LSDStatsTools.cppand then:
svn commit -m "Added new objects to bring up to date with BIG MERGE"
2.2.7. Tags and branches
At some point you will need to make tags or branches. These operate more or less in the same way, the only difference is that as a user you ought not make further commits to any of the tags folders.
A tag is a working version of the source code at some point in the development that you don’t want modified.
Making a tag or a branch involves the svn copy command. To make a tag in our repository you would run:
svn copy https://svn-kerberos.ecdf.ed.ac.uk/repo/geos/LSD_devel/LSDTopoTools/trunk https://svn-kerberos.ecdf.ed.ac.uk/repo/geos/LSD_devel/LSDTopoTools/tags/working_chi_20sept -m "Tagging the version of the chi analysis that is working as of 20th sept 2013."You could make a branch with:
svn copy https://svn-kerberos.ecdf.ed.ac.uk/repo/geos/LSD_devel/LSDTopoTools/trunk https://svn-kerberos.ecdf.ed.ac.uk/repo/geos/LSD_devel/LSDTopoTools/branches/LSDModel -m "A branch that includes objects for forward modelling of landscapes."
2.2.7.1. Keeping branches up to date with the trunk
Suppose you have made a branch and are happily updating that branch. Meanwhile, others are working on the trunk. To keep your branch up to date with the trunk, you need to use the merge command. First navigate to the branch:
$pwd

/home/smudd/devel_projects/LSDTopoTools/branches/LSDModel
Now use the merge command:
svn merge /home/smudd/devel_projects/LSDTopoTools/trunkThis may involve some conflict resolution, which you can read about below or on the internets, like here here or here <http://www.tutorialspoint.com/svn/svn_resolve_conflicts.htm>. If you are the sort that can read the svn red book, here is its conflict resolution page.
2.2.7.2. Notes on conflict resolution
So suppose you run the merge command. You sometimes get conflicts, which look a bit like this:
Conflict discovered in 'LSDRaster.hpp'.
Select: (p) postpone, (df) diff-full, (e) edit,
(mc) mine-conflict, (tc) theirs-conflict,
(s) show all options:
If you are merging, that means that “theirs-conflict” is the file you are merging with and “mine-conflict” is the file you are merging from, so for example if you have:
$pwd

/home/smudd/devel_projects/LSDTopoTools/branches/LSDModel
and run:
svn merge /home/smudd/devel_projects/LSDTopoTools/trunkit means that “mine” is in:
/home/smudd/devel_projects/LSDTopoTools/branches/LSDModeland “theirs” is in:
/home/smudd/devel_projects/LSDTopoTools/trunkYou can also go through editing and using diff files. It may, however, be tempting to “postpone” making changes. This doesn’t work how I (SMM) really would have expected. Instead of having to merge again and getting the conflict resolution screen again, instead you can proceed as normal but these will be stored as ‘conflicted’ copies.
To fix these conflicted copies you need to use the command:
svn resolveSo here is my experiment. I had a few conflicted files I postponed. You can see what is conflicted using:
svn status

C       LSDFlowInfo.hpp
M       LSDIndexRaster.cpp
M       LSDIndexRaster.hpp
M       LSDRaster.cpp
In this case LSDFlowInfo.hpp is conflicted. So I can resolve this by
svn resolve LSDFlowInfo.cpp –accept theirs-full
2.2.7.3. Merging a branch back into the trunk
Now let us get that branch back into the trunk. First you need to update the trunk with the merge command, just as above.
First navigate to the branch:
$pwd

/home/smudd/devel_projects/LSDTopoTools/branches/LSDModel
Now use the merge command:
svn merge /home/smudd/devel_projects/LSDTopoTools/trunkNow go to the trunk:
$pwd

/home/smudd/devel_projects/LSDTopoTools/trunk
And run the reintegrate command:
svn merge --reintegrate ^/LSDTopoTools/branches/LSDFloat_and_JunctionNote: I’ve tried using the full path name and it doesn’t work. You need to used the ^ symbol. After you have run this you need to commit:
svn commit -m "Merged the float and junction network branch back into trunk. The trunk floats instead of doubles." .Note: after you have done this you may with to merge other branches.
2.2.8. Importing a new directory tree into the repository
At some point you may wish to import a new directory tree into the repository. To do this you use the svn import command.
To import a directory tree, go to the directory in your terminal window and type:
svn import . https://svn-kerberos.ecdf.ed.ac.uk/repo/geos/LSD_devel/A_new_directory_treethe . Just means import everything in this directory.
Note that the subfolder A_new_directory_tree does not need to exist: subversion will create it for you.
NOTE It seems you will need to checkout the new directory tree after you’ve imported it to properly start subversioning.
2.2.9. Changing permissions
The instructions for changing permissions are here:,
To check out the authorization file, you need to run:
svn co https://svn-kerberos.ecdf.ed.ac.uk/repo/auth/geos/LSD_devel
2.2.9.1. A note on file permissions
The source code should not have execute permission. In a terminal window, you can check this with ls -l. There should be no x permission. You can remove execute permission with chmod a -x filename. The reason for this is that in a terminal window you want to be able to easily see which files are executable.
Another way to do this is with the 664 option on chmod. For example:
chmod 664 LSDIndexChannelTree.cppIf you check this file you get this:
-rw-rw-r-- 1 smudd smudd 37823 Apr 5 14:20 LSDIndexChannelTree.cppThis means that the owner can read and write to the file, the group can read and write, and anyone else can just read the file. Remember, if you make changes to permissions you’ve got to commit the changes!
2.3. Using the Edinburgh DataStore
If you are a user at the University of Edinburgh, you can donate some of your DataStore allocation to the group.
Our groupname is LSDTopoData.
2.3.1. Donating storage to the DataStore (this gives you access to it)
To register, you need to:
- Go to the web page: https://registration.ecdf.ed.ac.uk/storage/
- Under My DataStore Personal Space Allocations select allocate to shared space.
- Select datastore_geos_groups_LSDTopoData and assign some quota to it.
2.3.2. Creating a shortcut to the datastore from your home directory in Linux
It is very annoying to have to remember the path name to your DataStore directories, so you can create a shortcut to these.
To do this, just go into the directory from which you want the link in a terminal (this will probably be your home directory) and type:
ln -s /exports/csce/datastore/geos/groups/LSDTopoData NameOfLinkWhere NameOfLink is just the name you want for the link (I used LSDTopoData).
You could also do this for your personal DataStore folder:
ln -s /exports/csce/datastore/geos/users/UUN NameOfLinkwhere UUN is your university username. If you are a student this is your student number.
WARNING!!! If you sync your laptop or home computer to your M drive this will result in your home computer syncing to BOTH your M drive and your DataStore drive.
2.4. Using the supercomputer Eddie
Eddie is a high-performance cluster of computers that constitutes the main part of the Edinburgh Compute and Data Facility (ECDF). The ECDF also provides large scale storage computing services to the University of Edinburgh. The advantage of using Eddie rather than Burn is the capacity to run softwares in parallel using several CPUs simultaneously (CPU = Central Processing Unit). The time taken to compute problems is considerably cut down.
A dedicated website about Eddie is available at https://www.wiki.ed.ac.uk/display/ecdfwiki/Documentation/. If this is not enough (or if it is too much), queries should be addressed to IS.Helpline@ed.ac.uk.
2.4.1. The work space
The first step is to create an Eddie account at https://registration.ecdf.ed.ac.uk/eddiereg/. A free storage of 200GB is included in the account, you can request it here https://registration.ecdf.ed.ac.uk/storage/ (clic on “Request New Storage Area”). Please note that even though there is no charge, you are still required to fill in the budget holder and billing contact sections.
A specific directory has been set up for the Land Surface Dynamic group. With this directory comes 1TB backed up storage (for 3 years, starting Sept 2014) and 9 actual CPU cores. To access the group work space, you need first to have an Eddie account and then to be added to the project membership list (ask IS.Helpline@ed.ac.uk or mharel@staffmail.ed.ac.uk). The name of the group directory is geos_LandSurfaceDynamics (full address is /exports/work/geos_LandSurfaceDynamics).
To log in to Eddie, type the following ssh command in a new terminal:
ssh <youruun>@eddie.ecdf.ed.ac.ukusing your UUN and EASE password.
Your home directory is /exports/home/<youruun> (1GB allocated space). You should not read or write in the home directory with jobs, but always use the /exports/work file system.
2.4.2. Transfering data to and from Eddie
You need to copy all the files needed to run your job on Eddie. To copy to and from the cluster, you need to use the secure copy command scp. Some examples of syntax are given below:
Copy the file “myfile.txt” from your computer (the local host) to Eddie (the remote host):
scp myfile.txt <youruun>@eddie.ecdf.ed.ac.uk:/some/remote/directoryCopy the file “myfile.txt” from Eddie to the local host:
scp <youruun>@eddie.ecdf.ed.ac.uk:myfile.txt /some/local/directoryCopy the directory “mydir” from the local host to a remote host’s directory “fardir”:
scp -r mydir <youruun>@eddie.ecdf.ed.ac.uk:/some/remote/directory/fardirCopy multiple files from the remote host to your current directory on the local host:
scp <youruun>@eddie.ecdf.ed.ac.uk:~/\{myfile1.txt,myfile2.txt\} .More examples can be found at http://www.hypexr.org/linux_scp_help.php. If a command is not working on Eddie, try it on the local host instead.
2.4.3. Running jobs on Eddie
You can submit a job to the cluster with the command:
qsub -l h_rt=H:M:S jobscript.shwhere “H:M:S” is the maximum runtime in Hours:Minutes:Seconds, and must be less than 48 hours. “jobscript.sh” is the script that you want to execute. The job script contains the program to run as well as requests for resources. An example of job script may be found at https://www.wiki.ed.ac.uk/display/ecdfwiki/Submitting+Jobs.
To use the core from the group project, you need to add -P geos_landsurfacedynamics to your qsub commands (without capital letters). Type qstat in the command line to see your job’s state within the queue. To cancel a job, type:
qdel 12345where 12345 is the job-ID assigned to your job (visible with qstat).
Beware of the 48-hour clock wall limit. Users who need to run jobs for more than 48 hours are encouraged to use checkpointing (your application saves its running state to disk periodically, so that it can resume from where it left off when the job is stopped and restarted).
2.4.4. Summary
Log in to Eddie in a terminal:
ssh <youruun>@eddie.ecdf.ed.ac.uk
- Go to your work space directory (capital letters for LandSurfaceDynamics)::
cd /exports/work/geos_LandSurfaceDynamics
Copy your files on Eddie using scp, and create a job script jobscript.sh
Submit a job using the group project (no capital letters for landsurfacedynamics):
qsub -l h_rt=H:M:S -P geos_landsurfacedynamics jobscript.shMonitor and delete jobs with the qstat and qdel commands.
2.5. Installing Packages on Your Local Python Install
If you come across a package that you need that is not installed by default on burn you can install it using pip. The syntax for pip is very simple:
pip install <Package Name>
If you have root access this will install the package for all users. Sadly we don’t have such power, but we can tell pip to install to a local directory which we have write access to, and more importantly python will by default check this path for installed modules at runtime:
pip-python install --install-option="--prefix=$HOME/.local" <Package Name>
These switches point pip to install in .local in your home directory. Any path can be specified here, but your python PATH variable may need to be updated to reflect this new path.
For example if I wanted to install the LatLon module I would use the command:
pip-python install --install-option="--prefix=$HOME/.local" LatLon